I have my images available as a remote HTTP URL in my ViewModel and I wanted to do this the easy and fast way. I then created a target binding !
MvvmCross lets you create your own target binding by following these steps :
- Create an new class which inherits from MvxAndroidTargetBinding.
- Register this binding using the name you want in your Setup class.
- Use this new binding target
Creating the target binding
You simply have to inherits from the asbstract class MvxAndroidTargetBinding and implements the SetValueImpl method which will set the value (provided as an arg) to the target element (provided as an arg too).
In our case, I use Picasso to the bitmap on an ImageView :
[csharp]
public class ImageUrlToLoadBinding : MvxAndroidTargetBinding
{
public ImageUrlToLoadBinding(View target) : base(target) { }
public int PlaceHolderToUse { get; set; }
protected override void SetValueImpl(object target, object value)
{
var imageView = (ImageView)target;
Picasso.With(imageView.Context)
.Load(value as string)
.Into(imageView);
}
public override Type TargetType => typeof(string);
}
[/csharp]
Registering the target binding
In your Setup class, you have to register this custom binding using the name you want. This name will be the one used as a Target in your MvxBind attributes. To do this, you have to override the FillTargetFactories method.
In our case, I use “PosterImageUrlToLoad” as a key :
[csharp]
protected override void FillTargetFactories
(IMvxTargetBindingFactoryRegistry registry)
{
// register custom binding here
registry.RegisterCustomBindingFactory<View>
("ImageUrlToLoad", v => new ImageUrlToLoadBinding(v));
base.FillTargetFactories(registry);
}
[/csharp]
Using the target binding
This is the easiest part because it’s a casual binding simpley using your “name” as a target. I removed all the other attributes in this example :
[xml]<ImageView
local:MvxBind="ImageUrlToLoad ImageUrlManager.FinalImageUrl"
/>[/xml]
Happy coding !
]]>I am a big fan of the sqlite-net github project and I nearly alwayse include it’s 2 sources file in my projects needing to do some Sqlite. If youd dig in the source file, you will see that it declares a lot of DllImport using “sqlite3”. This mean that you have to include the sqlite3.dll in your app and that it will be shipped with it. Since the threshold version, you can use the version shipped with Windows10 by replacing all this “Sqlite3” by “winsqlite3”. That’s it !

Why you may want to do this
- Your app package will be smaller.
- Faster : the dll should be already loaded by the OS when you need it.
- You won’t have to install the Sqlite VSIX package.
- You will be on the same version of Sqlite than Windows (Youpi!).
Why you may NOT want to do this
- You won’t be using the latest version of Sqlite. If you depend of the latest available fix, it won’t be available.
- Sqlite may be updated by Windows and bring breaking changes to your app.
The full doc (for C++) is available on MSDN : https://msdn.microsoft.com/vi-vn/windows/uwp/data-access/sqlite-databases
Happy coding !
]]>The solution I ended up with is to create an AppDomain by “worker” and to execute the already existing code in each one. The context will be unique in each AppDomain and I will be able to reuse my existing code.
To have this working I have to perform these steps:
- Create a new class project “MaDllAPart” on which I add a reference to my existing code assembly.
- Create a new class “StartPoint” in it which inherits from MarshalByRefObject. This will let it be called from another AppDomain (my new WPF application in this case).
- Add an “Execute” Method to my StartPoint class which calls my legacy code.
- Create an AppDomain by thread, instanciate a StartPoint in this AppDomain.
- Instanciate a StartPoint in this AppDomain and call it’s Execute method.
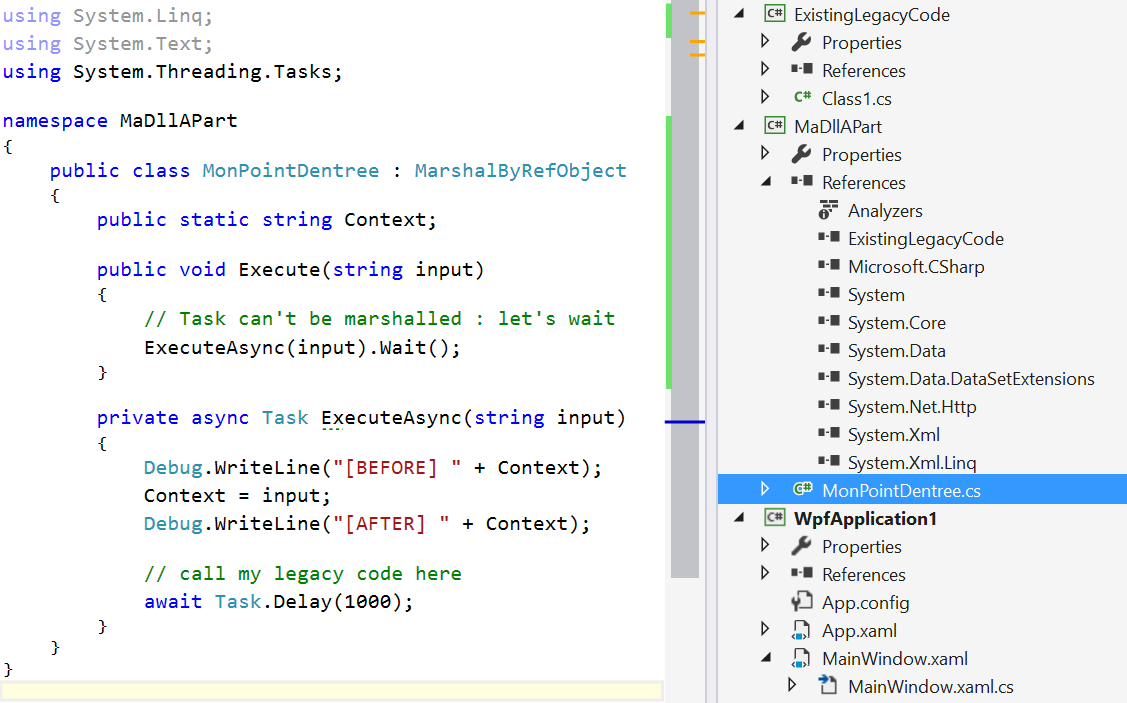
The code for the StartPoint class is very easy :
public class MonPointDentree : MarshalByRefObject
{
    public static string Context;

    public void Execute(string input)
    {
        // Task can't be marshalled : let's wait
        ExecuteAsync(input).Wait();
    }

    private async Task ExecuteAsync(string input)
    {
        Debug.WriteLine("[BEFORE] " + Context);
        Context = input;
        Debug.WriteLine("[AFTER] " + Context);

        // call my legacy code here
    }
}
The “MaDllAPart” is added as a reference to the WPF project : this let’s me create an instance of StartPoint without special configuration from my side. Be sure to use the full name (with the namespace) of the instanciated type.
private static void LaunchProcess()
{
    for (int i = 0; i < 10; i++)
    {
        var domain = AppDomain.CreateDomain("MonAppDomain_" + i);

        var startPoint = (MonPointDentree)domain
            .CreateInstanceAndUnwrap("MaDllAPart", "MaDllAPart.StartPoint");

        startPoint.Execute("module " + i);
    }
}
Happy coding !
]]> The Windows Phone Toolkit is really useful.
Yesterday, while I was updating my ConsoTracker app, I met a strange bug using the CustomMessageBox : it was raising a nullReference exception.
Let’s see what was the issue and how to “fix” it.
What I was trying to do was this simple scenario :
- Ask the use if he wants to review my app in the OnNavigatedTo event using a CustomMessageBox
- If he answers ‘no’, navigate to another page.
- If it answers ‘yes’, show the marketplace review task.
As I like playing with tasks, I was using this code :
[csharp]
protected async override void OnNavigatedTo(NavigationEventArgs e)
{
base.OnNavigatedTo(e);
var mBox = new CustomMessageBox
{
Title = "Do you want to… ",
Message = " … click on yes ?",
LeftButtonContent = "Yes",
RightButtonContent = "No"
};
var result = await ShowAsync(mBox);
NavigationService.Navigate(new Uri("/OtherPage.xaml", UriKind.RelativeOrAbsolute));
}
public static async Task<CustomMessageBoxResult> ShowAsync(CustomMessageBox box)
{
var taskCompletionSource = new TaskCompletionSource<CustomMessageBoxResult>();
box.Dismissed += (a, b) => taskCompletionSource.TrySetResult(b.Result);
try { box.Show(); }
catch (Exception exception) { taskCompletionSource.TrySetException(exception); }
return await taskCompletionSource.Task;
}
[/csharp]
This code was throwing an exception. To fix it, I downloaded the source of the Windows Phone Toolkit and I saw that at the end of the dismissal animation, it was trying to access the “Popup” object which was null : BOUM !
So… how did I fix it ? Simply by waiting for the popup to be unloaded instead of using directly the Dismissed event of the CustomMessageBox :
[csharp]
public static async Task<CustomMessageBoxResult> ShowAsync(CustomMessageBox box)
{
var taskCompletionSource = new TaskCompletionSource<CustomMessageBoxResult>();
var result = CustomMessageBoxResult.None;
//Only store the result here.
box.Dismissed += (a, b) => result = b.Result;
//Use this event to set the result.
box.Unloaded += (_, __) => taskCompletionSource.TrySetResult(result);
try { box.Show(); }
catch (Exception exception) { taskCompletionSource.TrySetException(exception); }
return await taskCompletionSource.Task;
}
[/csharp]
I hope it will save you some time too 
 Hi everyone,
The techdays are over and it was a very good year !
I was a speaker in two sessions, one with Thomas on WPF 4.5 and one another with Luc on WPF Memory Leaks.
A lot of people asked me to share the code of the demos and here it is !


The demo and code of some Memory leaks in Xaml UI can be found is at this adress : http://db.tt/DxucfSJV
The demo and code of the WPF 4.5 new features is at this adress : http://db.tt/2GqhvRdO
I hope you enjoyed the show and if you can provide me feedback I will be happy to hear them !
]]> This is the part number 13 of the serie on the WPF 4.5 new features.
ICustomTypeProvider is an interface already known in the Silverlight 5 world but it is shipped with full support in WPF 4.5 too.
In this post we will discover what is the interface ICustomTypeProvider and how it can be used in WPF 4.5 !
ICustomTypeProvider : what is it ?
You may already know the ICustomTypeDescriptor (notice the ‘Descriptor‘ instead of the ‘Provider‘) interface as you are all WPF fans :-p ! This interface let you decide what information your type will expose when reflection is used.
Binding uses reflection… So by implementing this interface you can define a set of dynamic properties and create binding targeting them. This is particulary useful when you are building a framework or when you know the properties name only at runtime.
ICustomTypeProvider is basically the same thing but it is lighter and designed for Silverlight at start.
As this subject is covered since a long time for Silverlight 5, I won’t go in details on it. If you want more information you can read these helpful posts:
- Binding to Dynamic Properties with ICustomTypeProvider (Silverlight 5 Beta) by Alexandra Rusina.
- SL5: ICustomTypeProvider by Matthiey Mezil.
- The MSDN page on it.
The thing to read in this post is that there is an helper class which helps you to create dynamic types. You can find an updated version of Alexandra’s one on Matthieu’s blog.
Make it work for WPF 4.5
The helper class does not works out of the box for WPF. Some pieces are actually missing for it to work but the fixes are not too hard to implement.
First of all, you must override the CustomType.TypeHandle property to return the correct TypeHandle :
[csharp]public override RuntimeTypeHandle TypeHandle
{
get { return _baseType.TypeHandle; }
}
[/csharp]
If you want to discover what is this struct RuntimeHandle and its purpose, read this post from Vance Morisson.
Then you have to override the GetGetMethod and GetSetMethod of the CustomPropertyInfoHelper class. For this you’ll need the type o containing the property(I provide it trough the constructor). This can be done quick and dirty like this:
[csharp] public override MethodInfo GetGetMethod(bool nonPublic)
{
Action<object> getMethod = (object obj) =>
_fatherType.GetMethod("GetPropertyValue")
.Invoke(obj, new[] { _name });
return getMethod.Method;
}
public override MethodInfo GetSetMethod(bool nonPublic)
{
Action<object, object> setMethod = (object obj, object value) =>
_fatherType.GetMethod("SetPropertyValue")
.Invoke(obj, new[] { _name, value });
return setMethod.Method;
}
[/csharp]
How do I use it in my WPF app ?
With the helper you can create types dynamically. In the demo project on my dropbox folder (registration link), I create a class named ‘MyNewClass’ and add a property ‘Name’ to it in a static constructor.
[csharp] public class MyNewClass : CustomTypeHelper<MyNewClass>
{
static MyNewClass()
{
CustomTypeHelper<MyNewClass>.AddProperty("Name", typeof(string));
}
public MyNewClass(string p)
{
SetPropertyValue("Name", p);
}
}
[/csharp]
Once this is done, I can use it in a ViewModel to create a collection of this type:
[csharp] var classes = new ObservableCollection<MyNewClass>();
for (int i = 0; i < 50; i++)
{
classes.Add(new MyNewClass(string.Format("Person {0:##}", (1 + i))));
}
MyNewClasses = classes;
[/csharp]
Then, I can create binding on the dynamic property Name in my XAML:
[xml]<DataTemplate x:Key="PersonDataTemplate" DataType="model:Person">
<Border>
<TextBlock Text="{Binding Name}"/>
</Border>
</DataTemplate>
<!– More xaml code –>
<ListBox ItemsSource="{Binding MyNewClasses}"
ItemTemplate="{StaticResource PersonDataTemplate}"
HorizontalContentAlignment="Stretch" />
[/xml]
It works like a charm

 Today, it’s a blog on a tip to use the values of an enum as the source of an ItemsControl (ListBox, ComboBox, ListView, etc.) and display them nicely using attributes.
We’ll provide a localized description to be displayed and the value will still be available to the binding.
In this post we’ll discover two very similar but differents solutions to this common issue.
[table-of-content]
Foundations
The foundation of the solution is based on reflection.
For a provided type, the RetrieveFromCacheOrAddIt method read the Display attributes and create a list of tuples from it. A cache is created so the reflection is done only once by type.
The first item (Item1) of the tuple is the real value and the second item (Item2) is the text to be displayed. If the attribute is not found, then the value of the enum is used as a description.
The display attribute can be found in the System.ComponentModel.DataAnnotations.dll assembly.
[csharp]
//The cache to use
private readonly Dictionary<Type, List<Tuple<Object, Object>>>
_cache = new Dictionary<Type, List<Tuple<Object, Object>>>();
//The method which fill the cache.
private object RetrieveFromCacheOrAddIt(Type type)
{
//if it is not already in cache
if (!this._cache.ContainsKey(type))
{
//get the fields of the type via reflection
var fields = type.GetFields().Where(field => field.IsLiteral);
var values = new List<Tuple<Object, Object>>();
foreach (var field in fields)
{
//retrieve the display attributes of the fields
var a = (DisplayAttribute[])field
.GetCustomAttributes(typeof(DisplayAttribute), false);
var valueOfField = field.GetValue(type);
//if there is a display attribute on the field.
if (a.Length > 0)
{
var newTuple1 =
new Tuple<Object, Object>(valueOfField, a[0].GetName());
values.Add(newTuple1);
}
//if not, use the value
else
{
var newTuple =
new Tuple<Object, Object>(valueOfField, valueOfField);
values.Add(newTuple);
}
}
this._cache[type] = values;
}
return this._cache[type];
}[/csharp]
Here is an example of an enum with the correct DisplayAttributes set:
[csharp] public enum MyEnum
{
[Display(Name = "My fist name to display")]
ValueOne,
[Display(Name = "My second name to display")]
ValueTwo,
[Display(Name = "My third name to display")]
ValueThird,
ValueFourWithNoDisplayAttribute
}[/csharp]
Use a converter
The first idea which comes in our WPF developer brain is to use a converter. This is easy to implement and pretty classic.
Here is the codeof the converter and the regarding XAML usage.
[csharp] public object Convert(object value, Type targetType,
object parameter, System.Globalization.CultureInfo culture)
{
var type = value as Type;
return type == null ? null : RetrieveFromCacheOrAddIt(type);
}[/csharp]
The converter is defined in a resource scope available to the binding and the Type of the enum is provided by setting the Source property of the binding to the target enum type using the x:Type markup extension. Here is an example:
[xml]
<DockPanel Margin="10">
<DockPanel.Resources>
<local:EnumToDictionnaryConverter x:Key="EnumToDictionnaryConverter" />
</DockPanel.Resources>
<TextBlock DockPanel.Dock="Left" Text="First solution : " FontWeight="Bold" />
<ComboBox DisplayMemberPath="Item2" SelectedValuePath="Item1"
SelectedValue="{Binding MyPropertyOnTheViewModel}"
ItemsSource="{Binding Source={x:Type local:MyEnum},
Converter={StaticResource EnumToDictionnaryConverter}}" />
</DockPanel>[/xml]
Use a markup extension
The second idea, really less verbose, is to create a markup extension. The type of the enum will be provided as a parameter.
Here is the code of the extension and the XAML usage of it below.
[csharp] public class EnumToDictionnaryExtension : MarkupExtension
{
public Type TargetEnum { get; set; }
public EnumToDictionnaryExtension(Type type) { TargetEnum = type; }
public override object ProvideValue(IServiceProvider serviceProvider)
{
var type = TargetEnum;
if (type == null) return null;
return RetrieveFromCacheOrAddIt(type);
}
//RetrieveFromCacheOrAddIt snippet from above !
}[/csharp]
DisplayMemberPath and SelectedValuePath still need to be set but there is no converter to define and unusual binding source to use.
[xml]
<ComboBox DisplayMemberPath="Item2" SelectedValuePath="Item1"
ItemsSource="{local:EnumToDictionnary {x:Type local:MyEnum}}" />[/xml]
Localisation – i18n
If you want to localize the used text, you can provide the type of a resource file to use.
The Display attribute GetName method will automatically pull the value from the resource file with the ‘name’ key of the attribute.
For example if I change the previous enum to the definition below, I will have to create a resource file (Localized.resx) and add values for the keys ‘Value1’, ‘Value2’ and ‘Value3’.
[csharp]public enum MyEnum
{
[Display(Name = "Value1", ResourceType = typeof(Localized))]
ValueOne,
[Display(Name = "Value2", ResourceType = typeof(Localized))]
ValueTwo,
[Display(Name = "Value3", ResourceType = typeof(Localized))]
ValueThird,
}[/csharp]
Then I can also create an another resource file named Localized.fr-FR.resx and translate the description in french.

If I set the culture of the UI thread to french, the values will be translated in it. Tada !
[csharp]Thread.CurrentThread.CurrentUICulture = CultureInfo.GetCultureInfo("fr-FR");[/csharp]

Demo
I created a little demo which you can find in my DropBox folder. It presents the two solutions. As you can see in the screenshot below, if no display attribute is set, the value of the enum is used:

[/table-of-content]
]]> One more quick post on Coded UI tests recording issue. Today, the coded UI test builder tool said to me “The recorder encountered a wrong control while recording the last action.” !
After some search in my app, I found out that it’is related to a ScrollViewer in a TabControl.
In this post we’ll see how I solved it…
The issue
The problem is easy to reproduce: inside a tabcontrol, add a TabItem and set its ContentTemplate with a DataTemplate containing a ScrollViewer. Then try to record any action inside the TabItem using the Coded UI Test Builder. You won’t be able to do it.

You can even set the ContentTemplate of the TabControl as pointed out on the Connect web site.
Here is an example of the XAML which does not work:
[xml]<TabControl Margin="0" x:Name="MainTabControl">
<TabItem Header="Tab">
<TabItem.ContentTemplate>
<DataTemplate>
<ScrollViewer>
<DockPanel>
<Button DockPanel.Dock="Bottom" Content="Youpi !"
Click="onButtonClick" />
<TextBox Text="a value " />
</DockPanel>
</ScrollViewer>
</DataTemplate>
</TabItem.ContentTemplate>
</TabItem>
</TabControl>[/xml]
The solution
The solution is the same than for the TextBox issue : you have to create a fixed version of the ScrollViewer and use it instead of the standard one.
The fixed version simply provide an automation peer which returns true when the UI test framework ask him if it’s a ControlElement. Here is the regarding code :
[csharp]public class FixedScrollViewer : ScrollViewer
{
protected override AutomationPeer OnCreateAutomationPeer()
{
var peer = new FixedScrollViewerAutomationPeer(this);
return peer;
}
}
public class FixedScrollViewerAutomationPeer : ScrollViewerAutomationPeer
{
public FixedScrollViewerAutomationPeer(ScrollViewer target)
: base(target)
{
}
protected override bool IsContentElementCore()
{
var isContentElementCore = base.IsContentElementCore();
return isContentElementCore;
}
protected override bool IsControlElementCore()
{
//If in a template it returns false and it breaks the CUITB :'(
return true;
}
}[/csharp]
MS fix : Visual Studio 2011
This bug is on connect and Mathew Aniyan, the Visual Studio ALM program manager, noticed us that it will be fixed in the next version (VS2011 and Framework 4.5).
Regards,
]]> In the previous post, we have seen that setting the AutomationId can greatly help us when we want to perform some UI Tests.
Todyay, I struggled with a problem which seems common after some digging on the net : the TextBlock control is not found and no assertion can be set on it.
But it does not always occur and it is then difficult to debug this strange behavior.
In this post we’ll see why this happen and how to solve this issue.
Why and When ?
The problem comes from the TextBlockAutomationPeer. If you digg into its code you can find this :
[csharp]override protected bool IsControlElementCore()
{
return ((TextBlock)Owner).TemplatedParent == null;
} [/csharp]
This basically means that if the TextBlock is inside a template, any kind of template, it is not exposed.
For example, if in an ItemsControl, a Listbox or another control, you use a DataTemplate containing a TextBlock, this one won’t be find by the automation client. Here is a code example :
[xml]<Grid>
<Grid.Resources>
<DataTemplate x:Key="ItemTemplate">
<TextBlock Text="{Binding }" />
</DataTemplate>
</Grid.Resources>
<ListBox ItemsSource="{Binding }"
ItemTemplate="{StaticResource ItemTemplate}" />
</Grid>[/xml]
A solution
The only dirty solution I find is to create your own TextBlock control with its own corrected AutomationPeer.
It will be based on the original TextBlockAutomationPeer but the IsControlElementCore method will always return true.
As a bonus, I let commented a snippet which will expose the TextBlock only if an AutomationId is set on it.
The code to write is really light. The real issue is that you have to update every TextBlock usage in the XAML of your application.
[csharp]
public class AutomatisableTextBlock : TextBlock
{
protected override AutomationPeer OnCreateAutomationPeer()
{
return new AlwaysVisibleTextBlockAutomationPeer(this);
}
}
//The corrected AutomationPeer is based on the TextBlockAutomationPeer
public class AlwaysVisibleTextBlockAutomationPeer : TextBlockAutomationPeer
{
public AlwaysVisibleTextBlockAutomationPeer(TextBlock t)
: base(t) { }
protected override bool IsControlElementCore()
{
//if (String.IsNullOrEmpty(GetAutomationId()))
// return false;
return true;
}
}
[/csharp]
Finally, the demo app XAML needs to be updated:
[xml]
<Grid>
<Grid.Resources>
<DataTemplate x:Key="ItemTemplate">
<local:AutomatisableTextBlock Text="{Binding }" />
</DataTemplate>
</Grid.Resources>
<ListBox ItemsSource="{Binding }"
ItemTemplate="{StaticResource ItemTemplate}" />
</Grid>[/xml]
After the update, the TextBlock is correctly found by any automation client:

 In my previous post on Coded UI tests, we have seen how to make a control discoverable by a Microsoft UI Automation client including the Coded UI tests builder.
This is a first step and the controls now need to be uniquely identified. This is done via the AutomationId property. In this post we’ll digg a little more in coded UI tests and discover the AutomationId property.
[table-of-content]
AutomationId : what is it ?
As stated in the previous post, an application exposes AutomationPeer. They are then found by UI Automation Client as AutomationElement objects. These items are identified uniquely by the AutomationId property.
This identifier is not mandatory but it’s a best practice to set it when you plan to perform UI tests.
To retrieve a control, the automation peer tree is used : first the top element is found, then the automation client iterate on its children, then the children of the children until it finds the aimed element. Each of the children and the final target is find using conditions and usually, one is set on the automation id.
The automation id is a property which helps you to find a specific UI element among others. This is, for example, very useful when you want to find a specific item in a collection (listbox, menus, etc.). Another benefit is that, as the control is uniquely identified, you can move it elsewhere or change its name and it will still be found by a previous code needing it.
To leverage the power of it, there is a rule to respect: it’s expected to be the same in any instance of the same application and ‘unique by instance in its scope‘.
- If you exit the application and launch it again, the value will not change.
- If you change the culture of the PC/Application, it will not change.
- If you launch several instance of the application, it remains the same on each of them.
- If there is several usage of the control in the application, each of them has a different automation id on each scope. A scope is defined by the path in the tree to go to the element. For example each menu item of a menu can be named in a generic way : menuItem1, menuItem2, etc.
This is a rule and you are not forced by the runtime or anything to follow it. As a proof, AutomationPeer returns a default value of string.empty which is really not unique!
By the way, if you want to set a name to a control(for example to improve accesibility) uses the Name property instead of the AutomationId one.
How to set it ?
The AutomationPeer exposes a method GetAutomationId of type string. When you create a custom AutomationPeer, you can override the GetAutomationIdCore abstract method to return a custom value. The default value is string.empty.
You can also set the returned value via XAML using the AutomationProperties’s AutomationId attached property.
[xml]<MyControl AutomationProperties.AutomationId="AnUniqueValue"/>[/xml]
The default implementation (which you can override) of the the AutomationPeer’s GetAutomationIdCore method read the value from the attached property too:
[csharp]
//In the AutomationPeer class.
protected override string GetAutomationIdCore()
{
return (AutomationProperties.GetAutomationId(_owner));
}[/csharp]
How to use it in automation clients ?
This is pretty straightforward, you just have to define a condition on it, providing the searched value:
[csharp]string seekedAutomationId = "AnUniqueValue";
//Create the condition
var condition = new PropertyCondition(
AutomationElement.AutomationIdProperty, seekedAutomationId);
//Retrieve the element via FindFirst(best practice)
var elt = AutomationElement.RootElement.FindFirst(TreeScope.Descendants, condition);
[/csharp]
Also, you can retrieve the AutomationId value of an element using this code:
[csharp]AutomationElement autoElement = //Retrieves the auto element here.
string autoId =
autoElement.GetCurrentPropertyValue(AutomationElement.AutomationIdProperty)
as string;[/csharp]
How is it used by the Coded UI tests builder ?
This tool is the one shipped with Visual Studio with which you can record coded UI tests.
If no AutomationId is set, the tools generates code which search the button based on its properties’ values. As you can see, if you move the button elsewhere, the test won’t be able to find it again.
[csharp]var mUIYoupiButton1 = new WpfButton(this);
#region Search Criteria
mUIYoupiButton1.SearchProperties[WpfButton.PropertyNames.Name] = "Youpi !";
mUIYoupiButton1.SearchProperties[WpfButton.PropertyNames.Instance] = "2";
mUIYoupiButton1.WindowTitles.Add("MainWindow");
#endregion
return mUIYoupiButton1;
[/csharp]
When you set the automation id, the generated code is smart enough to use it to identify the button:
[csharp]var mUIYoupiButton = new WpfButton(this);
#region Search Criteria
mUIYoupiButton
.SearchProperties[WpfButton.PropertyNames.AutomationId] = "AnUniqueValue";
mUIYoupiButton.WindowTitles.Add("MainWindow");
#endregion
return mUIYoupiButton;[/csharp]
How to find it on existing application ?
Snoop for a WPF application, UI Spy for a Silverlight one !
As this is a standard property you can read it as any other with these tools! In using it, don’t forget that it’s not an inherited property and that you have to select precisely the control (It can be difficult using the Ctrl+Shift shortcut).

When to set the AutomationId ?
As you’ve read, this is not mandatory to set it but it is a best practice.
My opinion is to do it right when you code in any application which may be tested trough coded UI tests.
To set it on all control is useless because not all control will be tested. Instead, I recommend to identify the key controls of the application. Usually, it’s button, menu items, any controls which can receive input from the users (keyboard and/or mouse).
Also, don’t forget the controls which evolve on user interaction and display results / information.
It can be a good thing, before to start to write any code, to set up a meeting with the quality team, deciding what are those controls. The member of the quality team usually know what they test
AutomationId and ItemsControl or dynamically generated controls.
In any user interface, there is dynamic parts. One of the most common are ItemsControls. A recurrent question is “how can I define an AutomationId on something which is dynamic ?“.
My answer is : “as you would do for any other problem – via a binding“. The AutomationId is an attached dependency property and you can set a binding on it which will solve your problem.
Let’s say, that I want to display a list of person, then in the DataTemplate representing a person, I can use the Id property of the person as an Automation id. Here is an example:
[xml]<DataTemplate x:Key="PersonDataTemplate" DataType="model:Person">
<TextBlock Text="{Binding Name}">
<AutomationProperties.AutomationId>
<MultiBinding StringFormat="AID_{0}-{1}">
<Binding Path="Name" />
<Binding Path="Id" />
</MultiBinding >
</AutomationProperties.AutomationId>
</TextBlock>
</DataTemplate>
<ItemsControl x:Name="_myItemsControl"
ItemTemplate="{StaticResource PersonDataTemplate}" />
[/xml]
The real issue is to respect the previously mentioned rule: “how to keep the id unique and the same in all the instance of the application”. The solution will depends of the application and the goal of the control.
If the aimed control is targeted because of the value it represents (a specific person) then you can generate the id using the model property (the id of the person).
If the aimed control is targeted because of its position in the interface (the 5th item in the list) then you can bind to UI-related properties like the alternation count for example. You can also find a technique which uses the index of the item in the list as an AutomationId.
I am sad to tell it but there is no solution which will work in all case 
More to read on the subject
If you want to discover more on this subject, here is some interesting links:
- Visual Studio Team Test blog posts on the subject : part 1 and part 2.
- UI Automation Properties Overview on MSDN.
- Use the AutomationID Property on MSDN.
- WPF Application Quality Guidelines on UI testing.
- My previous post on the subject explaining Automation peers.
[/table-of-content]
]]>