I am talking about this kind of error messages : “Exception thrown at 0x77694598 (KernelBase.dll) in MonAppli.Windows.exe: 0x40080201: WinRT originate error (parameters: 0x80072F19, 0x00000067, 0x0519EE60).” I looked for every hexadecomal code without success.
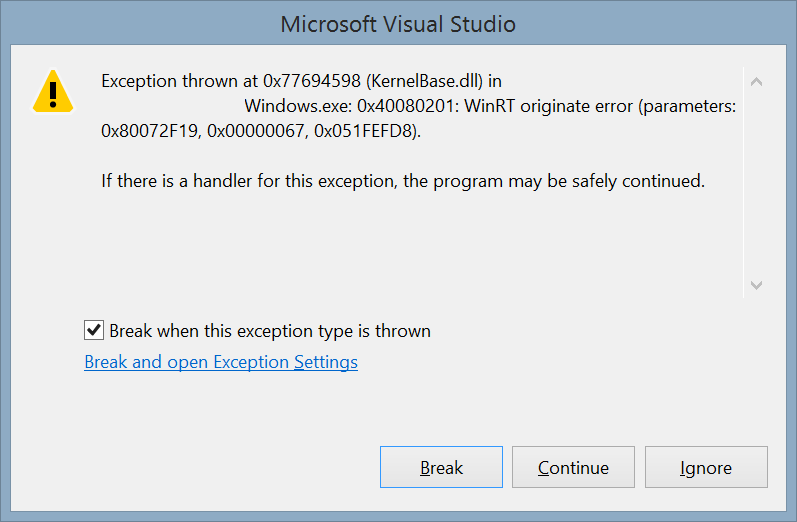
To get the message associated with this error, follow this procedure :
- Activat the native debugger : in the properties of your project, is at the end of the debug tab.
- Launch your app with the debugger attached and produced the exception.
- Copy the third hexadecimal code in the exception Windows (0x0519EE60 here).
- Click on Break.
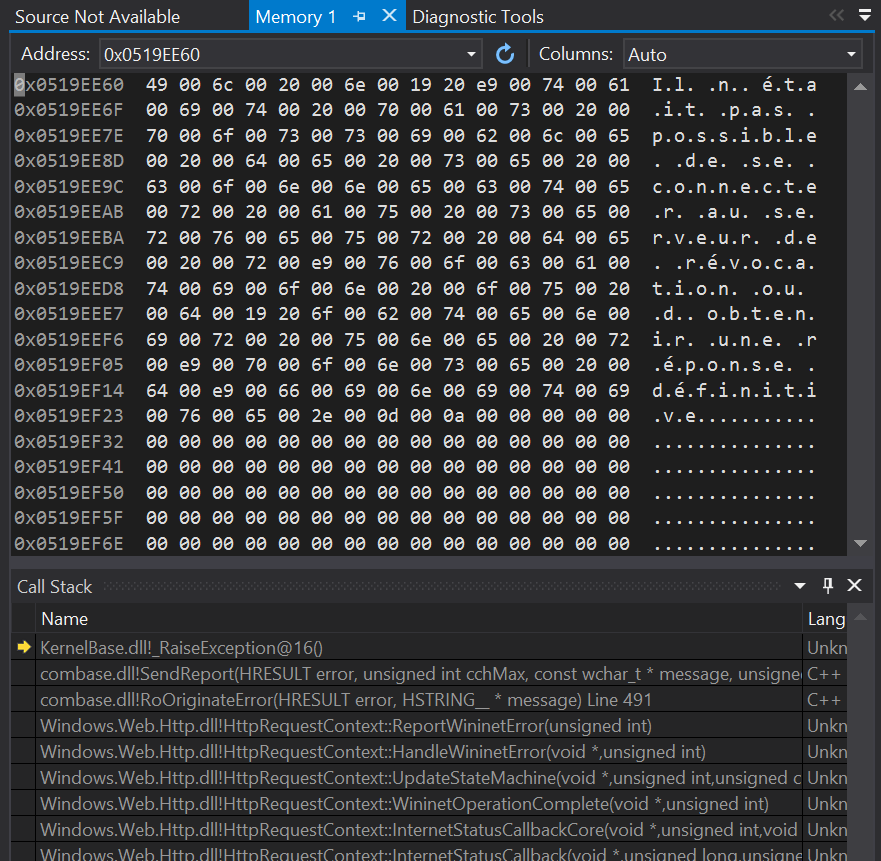
- Open the “Memory 1” Windows. It’s only available in Debug mode in this menu : “Debug > Windows > Memory > Memory 1”
- Paste the value in the adress text box and press the enter key
- The description is available at the right

The GetPixelDataAsync method of the BitmapDecoder class lets you get the pixels of a given picture and you can apply transformations during the process. I will the simply ask it to resize the image to a simple unique pixel. The resulting pixel will be the dominant color of the image.
[csharp]
//get the file
var file = await StorageFile.GetFileFromApplicationUriAsync(myLocalImageUri);
using (var stream = await file.OpenAsync(FileAccessMode.Read))
{
//Create a decoder for the image
var decoder = await BitmapDecoder.CreateAsync(stream);
//Create a transform to get a 1×1 image
var myTransform = new BitmapTransform { ScaledHeight = 1, ScaledWidth = 1 };
//Get the pixel provider
var pixels = await decoder.GetPixelDataAsync(
BitmapPixelFormat.Rgba8,
BitmapAlphaMode.Ignore,
myTransform ,
ExifOrientationMode.IgnoreExifOrientation,
ColorManagementMode.DoNotColorManage);
//Get the bytes of the 1×1 scaled image
var bytes = pixels.DetachPixelData();
//read the color
var myDominantColor = Color.FromArgb(255, bytes[0], bytes[1], bytes[2]);
}
[/csharp]
The code is extremely simple: open the file, open its stream, create a BitmapDecoder, grab the pixels applying the transform and read the color.

This was good old times and these issues are gone in Windows 8.1 : youpi !
Let’s digg a little more ![]()
The theme can be updated at runtime
Windows 8 theme resources are provided using StaticResource and so can’t be updated at runtime. The resources are loaded once at the app startup and even if you update it, the controls won’t update themselves because the StaticResource provide the value once and only once : when parsed.
Now comes a new markup extension named ThemeResource. You can use it like the StaticResource object but this special resource will update the targeted control if the Theme of the control is updated. You can see it as the DynamicResource in WPF but only for some “theme” resource and triggered only by a theme change.
Of course, all the template of the frameworks are now using this new feature and you are free (must ![]() ) use it in your own controls. You can actually use it anywhere in your XAML :
) use it in your own controls. You can actually use it anywhere in your XAML :
[xml]
<Border RequestedTheme="Light"
Background="{ThemeResource ApplicationPageBackgroundThemeBrush}">
</Border>
[/xml]
The theme can now be set by control
In Windows 8 you had to set the RequestedTheme property at launch (in the constructor of you app for example) and it could be set only once.
Now this is a property of the FrameworkElement class which is the base class for any control. The value will be inherited by all its children (this is actually done because it overrides values in the resource dictionary which will be available to the children of the control).
In this sample I override the theme twice in the same visual tree :
[xml]
<StackPanel RequestedTheme="Light"
Background="{ThemeResource ApplicationPageBackgroundThemeBrush}">
<TextBlock Text="Hello World !" />
<Border RequestedTheme="Dark"
Background="{ThemeResource ApplicationPageBackgroundThemeBrush}">
<TextBlock Text="Another theme" />
</Border>
</StackPanel>
[/xml]
It then produce this view :

Be aware that this is a “low priority” setting and that all the styles, directly set attributes/properties, triggers, animations and even implicit styles are winning over it.
Questions ?
- Can we set it by code ? : yes of course, this is a normal property.
- Can we use binding ? : Yes !
- What are the value of RequestedTheme for the children of a control ? : The value is “Default”. This only means that the value is not overriden and not that this use the App’s theme (it’s the theme of the first overriden parent which is used).
You can read this post in french too.
You can find more by exploring the “XAML requested theme sample (Windows 8.1)” of the samples pack provided by Microsoft.
Have a nice code
 As you can read on MSDN, there is in fact a lot of contracts available for a Windows 8 app.
Today, I want to describe one which is very useful for the Dropbox client I work on (8 Files In A Box) : The Cached File Updater contract.
As you will see, it can be really useful with the FileSavePicker contract.
First of all :
The code of this blog post is available here.
What is it ?
The Cached File Updater contracts simply declare that your app is responsible for the management of one or many of its files. This is really useful for ‘file management apps’.
You can usethe “CachedFileUpdater” to do some really interesting things :
- Activate the app before a read is done to your file.
- Activate the app after a write is done to your file.
- Set your file as read-only.
- Use a cached version of your file is internet is not available.
- Refuse access to the file if internet is not available
I refer to “a file” but this can be done on any file of your app.
How to use it ?
Using this contract is done in 4 steps, one being optional.
1)Declare the contract in the manifest.
The first thing, as for any contracts is to declare the contract in the app manifest. Simply add it :

2)Define some triggers on your file.
When you create a file in your app, you can define some triggers on it using the CachedFileUpdater.SetUpdateInformation method. This is a simple call and it takes 5 arguments :
- The Storage file itself.
- An id which will be passed to your app when activated for this file.
- A ReadActivationMode which define if the app is activated before the file is accessed or not.
- A WriteActivationMode which tells if your app is activated after an other app writes “on” your file, or if the file must be read-only.
- A CachedFileOptions which tells how “behave” acces to the file when there is no internet connection.
Here is an example which ask your app to be activated after an another app writes on your file :
[csharp]CachedFileUpdater.SetUpdateInformation(fileCreated,
"A content id to identify the file.",
ReadActivationMode.NotNeeded,
WriteActivationMode.AfterWrite,
CachedFileOptions.None);
[/csharp]
3)Override the OnCachedFileUpdaterActivated method of the Application.
Once this is done, you can override the OnCachedFileUpdaterActivated method of your application. The provided arg will give you a propertie “CachedFileUpdaterUI” with some interesting information :
- An event “FileUpdateRequested” which will be raised when the previously defined triggers are reached.
- The property “UpdateTarget” which tells you if the file to update is “remote” (the file in your app) or “local”(the file in the other app).
- An UIRequested event raised when the user needs to provide some input to be able to update the file. We’ll go further on that later
When you don’t have to show any UI to the user, you’ll simply have to grab the file when the FileUpdateRequested event is raised and do something with the file. If the local file have to be updated, you can call the UpdateLocalFile method and provide an up to date file.
Also, you have to set the “args.Request.Status” depending of the success of the operation (in our case to FileUpdateStatus.Complete).
Here is an example :
[csharp]
protected override void
OnCachedFileUpdaterActivated(CachedFileUpdaterActivatedEventArgs args)
{
args.CachedFileUpdaterUI.FileUpdateRequested
+= OnCachedFileUpdaterUIFileUpdateRequested;
base.OnCachedFileUpdaterActivated(args);
//do not forget this
Window.Current.Activate();
}
void OnCachedFileUpdaterUIFileUpdateRequested(CachedFileUpdaterUI sender,
FileUpdateRequestedEventArgs args)
{
var deferral = args.Request.GetDeferral();
var theContentId = args.Request.ContentId;
var theTargetFile = args.Request.File;
//Do something to the file
//If the local file have to be updated, call do this :
//StorageFile upToDateFile=null;
//fill upToDateFile with the correct data
//args.Request.UpdateLocalFile(upToDateFile);
args.Request.Status=FileUpdateStatus.Complete
deferral.Complete();
}
[/csharp]
4) Ask the user for some input (optional).
If the update process needs it, you can ask the user for some input.
To do so, you have to tell it in the FileUpdateRequested event handler using the args.Request.Status and set it to FileUpdateStatus.UserInputNeeded.
[csharp]
if (sender.UIStatus == UIStatus.Hidden)
{
args.Request.Status = FileUpdateStatus.UserInputNeeded;
//Can set a custom title
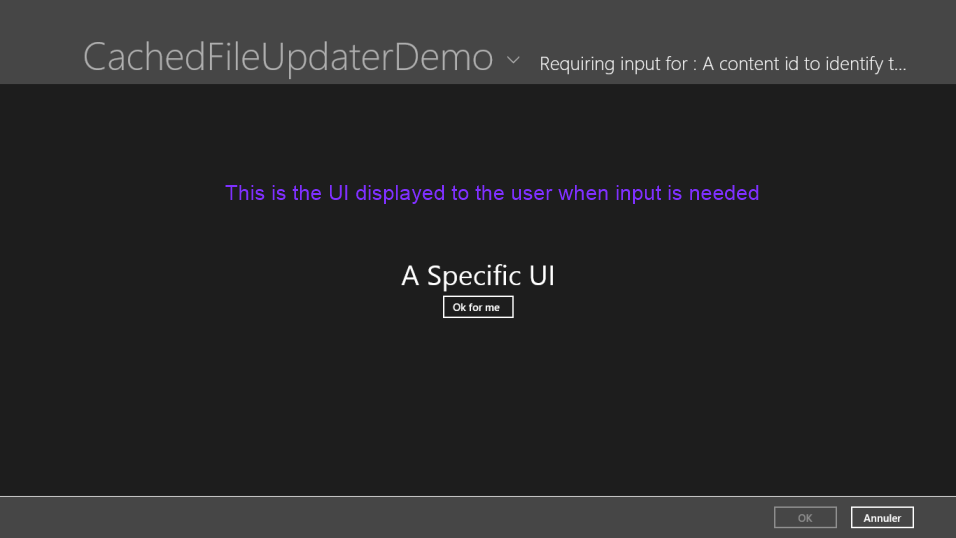
sender.Title = "Requiring input for : " + args.Request.ContentId;
return;
}
[/csharp]
The UIRequested event is then raised and you have to set the content of the Window to your specific UI in the handler. Don’t forget to do it in the right thread.Don’t forget to do it in the right thread : create the page in the first activation event and use the page Dispatcher to set the content.
[csharp]
void CachedFileUpdaterUI_UIRequested(CachedFileUpdaterUI sender, object args)
{
_specificUIPage.Dispatcher.RunAsync(
CoreDispatcherPriority.Normal,
() => { Window.Current.Content = _specificUIPage; });
}
[/csharp]
The FileUpdateRequested event will then be raised once more to inform you that the UI is visible. In the handler, you have to grab the event args and pass it to your UI. The UI will then be responsible to set the Request Status to the correct value. In my case, I save the args as a static field of my application.
[csharp]
public static FileUpdateRequestedEventArgs FileUpdateRequestedEventAr
void OnCachedFileUpdaterUIFileUpdateRequested(
CachedFileUpdaterUI sender, FileUpdateRequestedEventArgs args)
{
bool showSpecificUI = false;
FileUpdateRequestedEventArgs = args;
var deferral = args.Request.GetDeferral();
if (sender.UIStatus == UIStatus.Hidden)
{
args.Request.Status = FileUpdateStatus.UserInputNeeded;
//Can set a custom title for the UI
sender.Title = "Requiring input for : "
+ args.Request.ContentId;
deferral.Complete();
return;
}
if (sender.UIStatus == UIStatus.Unavailable)
{
//failure
args.Request.Status = FileUpdateStatus.Failed;
deferral.Complete();
return;
}
if (sender.UIStatus == UIStatus.Visible)
{
//Do nothing, the UI will do it for us.
return;
}
}
[/csharp]
In my UI, I simply set the status and complete the deferral when the user click on a button:
[csharp]
private void ButtonBase_OnClick(object sender, RoutedEventArgs e)
{
App.FileUpdateRequestedEventArgs
.Request.Status = FileUpdateStatus.Complete;
App.FileUpdateRequestedEventArgs
.Request.GetDeferral().Complete();
}
[/csharp]
Why is it useful with the FileSavePicker ?
In 8 Files In A Box, the Dropbox client for Windows 8, we wanted to be able to save a file and to upload it directly to the user Dropbox.
I first thought it was not possible : as soon as the file save picker provide a file to the requesting app, my app is shut down by Windows 8 and I have :
- no way to know when the provided file is fully written by the other app.
- no CPU time because my app is no more running.
Leonard one of my Infinite Square colleague demonstrated me that I was wrong (and that impossible is really not a French word:)).
It can in fact be done using the Cached File Updater contract :
- Provide a file the usual way in the file save picker UI.
- Use the WriteActivationMode.AfterWrite trigger on it.
- Launch an upload when my app is activated after the write is done.
Really simple in fact For those who best understand code (as me :)) here a code snippet :
[csharp]
protected override void
OnFileSavePickerActivated(FileSavePickerActivatedEventArgs args)
{
base.OnFileSavePickerActivated(args);
args.FileSavePickerUI.TargetFileRequested
+= FileSavePickerUI_TargetFileRequested;
}
async void FileSavePickerUI_TargetFileRequested(
FileSavePickerUI sender,
TargetFileRequestedEventArgs args)
{
var fileCreated = await ApplicationData.Current
.TemporaryFolder.CreateFileAsync("ThisIsACoolFileName");
CachedFileUpdater.SetUpdateInformation(fileCreated,
"A content id to identify the file.",
ReadActivationMode.BeforeAccess,
WriteActivationMode.AfterWrite,
CachedFileOptions.None);
args.Request.TargetFile = fileCreated;
}
[/csharp]
Others importants things to know
1) don’t forget to activate your app.
At first, I did not manage to make it works : the OnCachedFileUpdaterActivated method was called but the OnCachedFileUpdaterUIFileUpdateRequested event was never raised.
After some research on the internet, I finally found that the Windows.Current.Activate() call to activate your app is really necessary : do not forget it !
2) my app is not activated 
Finally, I just want to remind you that the app requesting the file is responsible to let Windows know that it has no more use of the file (the write is done). So if your app is not activated, it could be because the requesting app is simply not asking you to update the file.
If you are using (not implementing but using) the FileSavePicker, please calls the CachedFileManager methods like in this snippet from the file picker sample :
[csharp]
// Prevent updates to the remote version of the file until we
// finish making changes and call CompleteUpdatesAsync.
CachedFileManager.DeferUpdates(file);
// write to file
await FileIO.WriteTextAsync(file, file.Name);
// Let Windows know that we’re finished changing the file so the other
// app can update the remote version of the file.
// Completing updates may require Windows to ask for user input.
FileUpdateStatus status = await CachedFileManager.CompleteUpdatesAsync(file);
[/csharp]
3) be careful with the Dispatcher
When your app is activated, a Dispatcher is created for it. The CachedFileUpdaterUI use another Dispatcher and you have to be careful to be on the right dispatcher(yours) when updating your UI. For example when you set the content of your Windows, don’t forget to do it on your Dispatcher.
I let you digg into my attached code for a more complete example.
If you want another sample, you can download and use the File Picker sample on MSDN.
That’s all for today !
]]> In Metro apps, the Metro design is everywhere and that’s pretty cool !
When you start an application, you want and need it to be compliant with this theme and one main part of it are icons.
What you may not know is that there is already a lot of icons available for you out of the box in any Metro app.
Let’s discover them !
I don’t get the picture…
When I first looked for the icons, I first searched for pictures. I found none of them.
So I digged a little more on the sample and I found out that icons where here as a Font.
This is in fact a really good idea for several reasons :
- Fonts are vectorial.
- You can choose the colors of the icons just by changing a parameters.
- No need to add a lot of images files to your project
- It’s really easy to use/code !
Also, the font name is not the same in an HTML5 project than in an XAML one :
- an HTML5 app will use “Segoe UI Command” as Font family but “Segoe UI Symbol” as local name
- a XAML app will use Segoe UI Symbol
Which icons are available ?
Each icon is represented by it’s hexadecimal value. These values are the same in both langages.
XAML
My first idea was to create a XAML app which will list them all and display them in a GridView.
It’s pretty easy to do, here is the C# which creates the list :
[csharp]
//create a list of my custom class CharAvailable
List<CharAvailable> characters = new List<CharAvailable>();
//we will not cycle trough all the font values
var starter = 0xE10F – 200;
var ender = starter + 1000;
//Create the character list
for (int i = starter; i < ender; i++)
{
characters.Add(new CharAvailable() {
Value = string.Format("0x{0:X} : ", i),
CharToDisplay = (char)i });
}
//Set it as datacontext
DataContext = characters;
[/csharp]
And the XAML to display each item :
[xml] <TextBlock
Text="{Binding CharToDisplay}"
FontFamily="Segoe UI Symbol"
FontSize="34"
/>[/xml]
HTML5 / Javascript
When you want to display an icon in your HTML5 app, you just need to set the font family name to “Segoe UI Command” and to use the hexadecimal representation of the icon. Here is an example :
[html]
<p style="font-family: "Segoe UI Command";src:local("Segoe UI Symbol");">&#E195</p>
[/html]
Also, these icons are used by commands and you can then set the name of the icon as a shortcut instead of the hexadecimal value. For example here is how you can define a ‘favorite’ app bar command:
[javascript]
{id:’favorite’, icon:’favorite’, section: ‘selection’, onclick: iLoveIt}
[/javascript]
The full list of shortcut is available in the ui.js file (thank you Tom for the tip!).
I also created a PDF which list them all for easy retrieval. You can find it here.


