We wil do this using DirectX and Unity.
As you can see in this video, the “context” of the leaved Windows is kept : the scroll position does not change.
Opening another Windows from a n UWP app
Since a long time now, you can open a new Windows from a Windows Store app (UWP or Universal). For instance, the Mail app does this to let you edit an email in another dedicated window.
To perform this, you have to ask the SDK to create a new View (CoreApplicationView) which maps to a Window (CoreWindow) and an associated Dispatcher. This last point is interesting because you have to be very careful, when you share your ViewModels between windows, to be on the good Dispatcher when raising INotifyPropertyChanged event or doing some UI-related work.
Here is the code to create a Window :
// récupération de l'id courant pour usage ultérieur
var appViewId = ApplicationView.GetForCurrentView().Id;

//Create a new view \o/
CoreApplicationView newCoreAppView = CoreApplication.CreateNewView();

await newCoreAppView.Dispatcher.RunAsync(
    Windows.UI.Core.CoreDispatcherPriority.Low,
     () =>
     {
         //Get the created Windows
         Window window = Window.Current;
         ApplicationView newAppView = ApplicationView.GetForCurrentView();

         // create a new frame and navigate to the page
         var secondFrame = new Frame();
         window.Content = secondFrame;
         secondFrame.Navigate(typeof(MainPage));

         // activate the new Window
         window.Activate();

         // make the new window standalone
         ApplicationViewSwitcher.TryShowAsStandaloneAsync(newAppView.Id,
             ViewSizePreference.UseMore, appViewId, ViewSizePreference.Default);
     });
By providing no argument to the CreateNewView method, we ask the XAML framework to create and manage a XAML UI.
We could also provide an argument of type IFrameworkViewSource to be able to have our own Window managed by our code. This is what DirectX does and it will let us create holograms !
Displaying a 3D DirectX view from the 2D view
By using the “HolographicDirectXApp” Visual Studio sample, I have all I need to create and display a 3D rotating cube by. The generated code creates an instance of IFrameworkView using DirectX. The sample use SharpDX, some C# classes and shaders that I can simply copy/Paste directly in a new XAML UWP project.

I then only have to use the previous snippet and ask it to use the DirectX AppView.
I have to carefully :
- keep an instance of my AppViewSource : if it’s garbage collected, my 3D view will disappear.
- Activate the created Window for the DirectX view.
Of course, as all 3D holographic view, my start screen and the 2D View will disappear to let only the 3D objects in my space.

Displaying a 3D Unity view from the 2D view
An Unity app being an UWP app the code to write will be very similar. We will only have to customize the generated Unity code to stay in a 2D World instead of going directly to the 3D exclusive View.
To be in the right configuration, I generate a XAML project instead of a Direct3D player in Unity. I then have this :
- Unity initialization is done in the App class.
- A MainPage XAML app which finish the initialisation and is the first page navigated to.
To have a “standard” Xaml project, I then perform these modifications :
- I create a XAML “BlankPage” named StartupPage.
- I navigate to this page instead of MainPAge. I then stay in a 2D classic XAML context and I can build my application around it.
- I move the use of the AppCallbacks class from the App.cs class to the existing MainPage.
The next steps are easy : I create a new Window, add a frame in it and navigate to the MainPage. I use exactly the same snippet as before and I only have to register an event handler to the activation of the created Window to be able to initialize Unity then. I also store the main view’s Id for further use.
private async Task CreateNewHoloWindowAsync()
{
    var appViewId = MainAppViewId = ApplicationView.GetForCurrentView().Id;

    var _newCoreAppView = CoreApplication.CreateNewView();

    await _newCoreAppView.Dispatcher
        .RunAsync(CoreDispatcherPriority.Low,
      async () =>
      {
          var frame = new Frame();
          Window.Current.Content = frame;
          frame.Navigate(typeof(MainPage));

          var res = await ApplicationViewSwitcher.TryShowAsStandaloneAsync(
              ApplicationView.GetForCurrentView().Id,
              ViewSizePreference.Default, appViewId,
              ViewSizePreference.Default);

          _newCoreAppView.CoreWindow.Activated += WindowActivated;

          _newCoreAppView.CoreWindow.Activate();
      });
}

private void WindowActivated(object sender, WindowActivatedEventArgs e)
{
    if (e.WindowActivationState == CoreWindowActivationState.CodeActivated
        || e.WindowActivationState == CoreWindowActivationState.PointerActivated)
    {
        AppCallbacks.Instance.SetInitialViewActive();
        // Only need to mark initial activation once so unregister ourself
        CoreWindow coreWindowSender = sender as CoreWindow;
        coreWindowSender.Activated -= WindowActivated;
    }
}
Going back to the 2D View
To go back to the 2D XAML view, you have to use the ApplicationViewSwitcher class and ask it to go switch back to the main Window.
I provide my Unity’s code an Action (GoBackToEarth.CloseThisHolographicView) it can call when needed.
// let's capture the dispatcher of the current view
var dispatcher = Dispatcher;

GoBackToEarth.CloseThisHolographicView = () =>
{
    // be sure to be on the Window's Dispatcher
    dispatcher.RunIdleAsync(async _ =>
    {
        // go back to the main Window
        await ApplicationViewSwitcher.SwitchAsync(StartupPage.MainAppViewId);

        // we close the 3D holographic Window
        Window.Current.Close();
    });
};
Happy coding !
]]>I am talking about this kind of error messages : “Exception thrown at 0x77694598 (KernelBase.dll) in MonAppli.Windows.exe: 0x40080201: WinRT originate error (parameters: 0x80072F19, 0x00000067, 0x0519EE60).” I looked for every hexadecomal code without success.
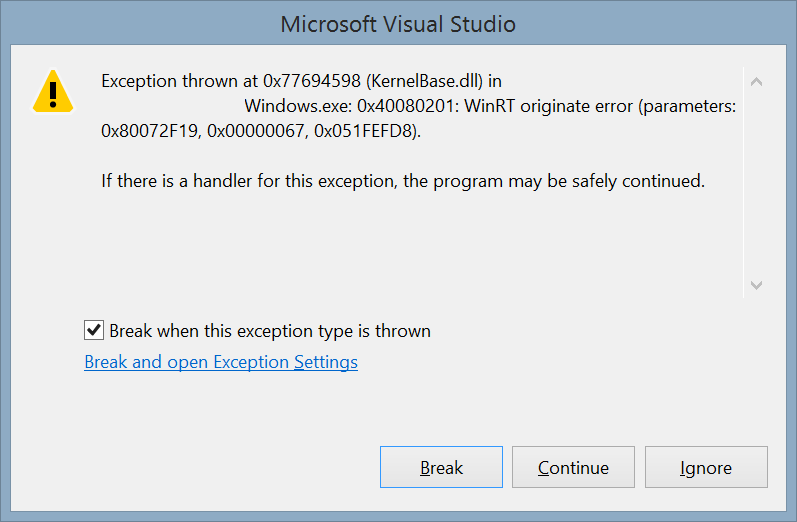
To get the message associated with this error, follow this procedure :
- Activat the native debugger : in the properties of your project, is at the end of the debug tab.
- Launch your app with the debugger attached and produced the exception.
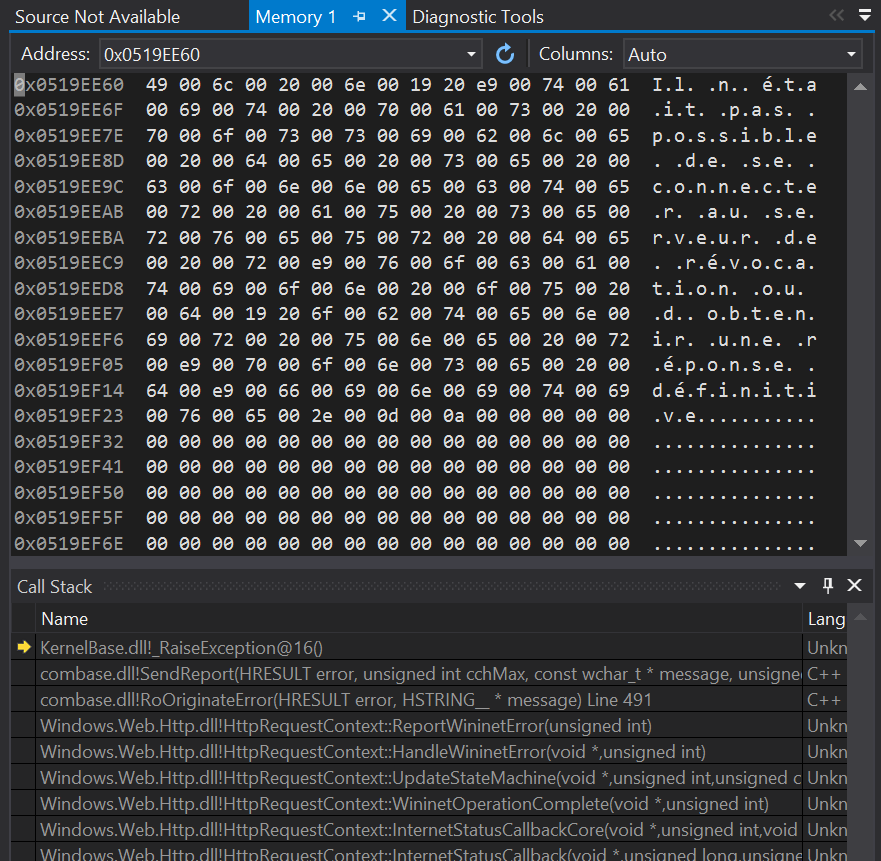
- Copy the third hexadecimal code in the exception Windows (0x0519EE60 here).
- Click on Break.
- Open the “Memory 1” Windows. It’s only available in Debug mode in this menu : “Debug > Windows > Memory > Memory 1”
- Paste the value in the adress text box and press the enter key
- The description is available at the right

- Download this project and add it to your solution : http://code.msdn.microsoft.com/wpapps/Language-Neutral-Resource-5894846e.
- Edit the string table in the AppResLib.rc file to set your app name, etc.
- Build this project and copy the resulting dll in your WP project. This will be the default values (neutral language)
- Change the values in the AppResLib.rc file for a specific language (for example french) and build again the project.
- Rename the resulting dll to AppResLib.dll.040c.mui and copy it at the root of the WP project, next to the dll. The “04OC” is specific to “French” and should be set to the value matching the target language. A full list is here : http://msdn.microsoft.com/en-us/goglobal/bb964664.aspx
- Do it again for as much language you want
- Select all the *.mui files and the AppResLib.dll file and set their build type to content in the properties Windows.
- Update your WMAppManifest.xml file and set the app name to this value : @AppResLib.dll,-100 . The value will then be taken for your file, depending of the user language, at the offset 100 in the string table.


Not really obvious but this works fine
If you want to see this feature in action, it will soon be available in our last app “Say it With Flowers” !
PS: the whole procedure is describe in depth on MSDN but I am sure you love this recap
PS2: the localized app name won’t be displayed on the Store page because of a bug in the Store : http://blog.webrox.fr/?p=61
]]>
You may already know these monitoring events available before and which are now no more supported :
- DOMNodeInserted
- DOMNodeRemoved
- DOMSubtreeModified
- DOMAttrModified
- DOMCharacterDataModified
They have been replaced by the MutationObserver in IE 11 because they have several drawbacks:
- They are standard JS events, so they bubble the whole DOM : bad for performance.
- They may spam you because each change raise an event without batching : bad for performance.
- They are synchronous and block your execution : bad for performance.
- Did I tell you that there may be performance issues?
The MutationObserver fix these issues and is really easy to use :
- Create a mutation observer by giving a callback function as a parameter.
- Observe an element and specify “what to observe”
- Do something in the callback
Creating a mutation observer is easy as instantiating an object. The callback function takes 2 parameters : an object describing the change and the second one will be the MutationObserver.
[js]function mutationObserverCallBack(changes, mutationObserver) {/*…*/ }
//Creation of the observer
var observer = new MutationObserver(mutationObserverCallBack);[/js]
Then you can observe any html element by calling the observe function on the observer. This function takes as a second parameter a json object with the “monitoring” options. For example, you can monitor only the addition/removal of element on any of its children and any change of “class” :
[js]
var observer = new MutationObserver(mutationObserverCallBack);
observer.observe(element, {
attributes: true,
attributeFilter: ["class"],
childList: true,
subtree: true,
});
[/js]
There is a lot of possible configuration and you can find a full list on this MSDN page.
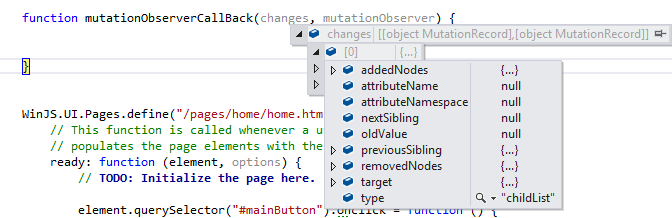
In the callback, you can explore the changes which is a list of the modifications. Each one has a type field and some properties (added nodes, old value, etc.) which let you know which change has been performed.
[js]function mutationObserverCallBack(changes, mutationObserver) {
changes.forEach(function (mutationRecord) {
console.log("Type of mutation: " + mutationRecord.type);
if ("attributes" === mutationRecord.type) {
console.log("Old attribute value: " + mutationRecord.oldValue);
}
});
}[/js]
Additionnal links
This is a just a quick blog post of this good new API. You can find more information on these pages :
]]>
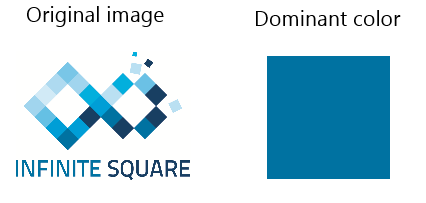
The GetPixelDataAsync method of the BitmapDecoder class lets you get the pixels of a given picture and you can apply transformations during the process. I will the simply ask it to resize the image to a simple unique pixel. The resulting pixel will be the dominant color of the image.
[csharp]
//get the file
var file = await StorageFile.GetFileFromApplicationUriAsync(myLocalImageUri);
using (var stream = await file.OpenAsync(FileAccessMode.Read))
{
//Create a decoder for the image
var decoder = await BitmapDecoder.CreateAsync(stream);
//Create a transform to get a 1×1 image
var myTransform = new BitmapTransform { ScaledHeight = 1, ScaledWidth = 1 };
//Get the pixel provider
var pixels = await decoder.GetPixelDataAsync(
BitmapPixelFormat.Rgba8,
BitmapAlphaMode.Ignore,
myTransform ,
ExifOrientationMode.IgnoreExifOrientation,
ColorManagementMode.DoNotColorManage);
//Get the bytes of the 1×1 scaled image
var bytes = pixels.DetachPixelData();
//read the color
var myDominantColor = Color.FromArgb(255, bytes[0], bytes[1], bytes[2]);
}
[/csharp]
The code is extremely simple: open the file, open its stream, create a BitmapDecoder, grab the pixels applying the transform and read the color.
 Windows 8.1 comes with a new feature in the WinJS SDK : a scheduler. Let’s see what it is and how to use it!
In Windows 8, every job is nearly done as soon as you execute it. You could play with the msSetImmediate function but it was still a little mode “hack” than “code”.
With Windows 8.1, the SDK introduce a scheduler used by the whole WinJS framework. This scheduler helps you to define what is important (animations, visual feedback, manage user input) from what can be delayed (background work, data processing not used immediatly).
The goal is to let you build application which reacts immedialty to the user will.
What’s in it ?
Everything lives in the WinJS.Utilities.Scheduler namepsace and is written in javascript.
This namespace is often shortcuted “Scheduler” or “S” in the Microsoft samples.
[js]var S = WinJS.Utilities.Scheduler;[/js]
There is 4 importants objects to know :
- WinJS.Utilities.Scheduler: the main namepsace with a lot of static function which lets you start and manage jobs
- WinJS.Utilities.Scheduler.IJob : everything thing is a job. When you start a task/work using the scheduler, it returns you an IJob object on which you can call management methods.
- WinJS.Utilities.Scheduler.IJobInfo : information passed to your work-function when executed.
- WinJS.Utilities.Scheduler.IOwnerToken : you want to be the owner of a task and manage a group of jobs then use this.
How to use it (101) ?
Launching a job is as simple as providing a function :
[js]
var job = WinJS.Utilities.Scheduler.schedule(function willBeExecuted(){
//work to be done
});
[/js]
There is some optional parameters that can be set too : a priority (default is WinJS.Utilities.Scheduler.Priority.normal.), a this parameter which will be set when the function is executed and name (useful when debugging):
[js]
var whoAmI = {};
var job = WinJS.Utilities.Scheduler.schedule(function willBeExecuted(){
//work to be done
} , WinJS.Utilities.Scheduler.Priority.normal, whoAmI, " I am the job name" );
[/js]
The returned object is a IJob object and you can call some function on it to cancel it’s scheduling, pause it, resume it and have some information like the name, the priority, the owner, etc.
[js]
//create a job
var job = WinJS.Utilities.Scheduler.schedule( /* …*/);
//pause the job
job.pause();
//resume it in 5 secs
WinJS.Promise.timeout(5000).then(job.resume);
//reads the name of the job
var name = job.name;
[/js]
IJobInfo and yielding
In this case “yielding” means “let other task more important than me start and do their job while I am executing and pause me”.
Let’s assume that you have a job which takes 10 seconds to be done and that you can split it in 10 parts.
Then you can launch the job with the scheduler, do the first part and tells it : do something else (other jobs with higher priority) if necessary then call me back. The Scheduler will then manage this process for you.
When your job is executed, a parameter is actually provided and it implements the IJobInfo interface. This jobInfo object has 2 important functions and 1 important field :
- setPromise: calling it providing a function tells the scheduler to wait for this promise before to call you back. If you need to download locally an internet resource, the Scheduler does not need to call you before and you can set a promise to wait for the download to be done.
- setWork : calling it providing a function tells the scheduler which function to call when it wants to continue your processing (after the execution of more importants tasks).
- shouldYield : read this to know if the function should yield : if true, you set the next function to call using the setWork function and you returns. If false, you do your job.
So how do we implement this feature ? By creating a processing function which will process each part in a loop. At each cycle, we will check if we have to yield. If so, we tells the scheduler to call us back when it wants to restart our process. If the process is done (10 parts processed) then we just returns.
Here is how I will implement this “10 parts processing”.
[js]var partProcessed = 0;
function executeYieldingTask() {
// schedule some work
S.schedule(function myScheduledJob(jobInfo) {
//Process the 10 parts
while (partProcessed < 10) {
//check if I have to yield :new job with higher priority
// may have been scheduled
if (jobInfo.shouldYield) {
//tells the Scheduler to execute myScheduledJob
// when it’s done executing higher priority task
jobInfo.setWork(myScheduledJob);
//we yield so we exit the ‘process loop’
break;
}
else {
/* process the part partProcessed */
partProcessed = partProcessed + 1;
}
}
}, S.Priority.idle);
}
[/js]
The IOwnerToken interface and how to use it
IOwnerToken is an interface which represents the owner of a job. By owner it means “master” : the one who controls and manage it.
A token can be set to multiple jobs at once and there is one function on this interface : cancelAll. This function simply cancel all the jobs owned by the token.
To create a token, you have to call the createOwnerToken function. You can then assign it to created job.
[js]
//create a token
var ownerToken = WinJS.Utilities.Scheduler.createOwnerToken();
//create jobs
var job1 = WinJS.Utilities.Scheduler.schedule( /* …*/);
var job2 = WinJS.Utilities.Scheduler.schedule( /* …*/);
//Be in control
job1.owner = ownerToken ;
job2.owner = ownerToken ;
//Cancel the jobs at once :
ownerToken.cancelAll();
[/js]
This token is then really useful when you want to manage a group of jobs at once. Create an owner, if the user do something else, goes to another page : you cancel all the task at once and retrieve some CPU juice.
Some useful functions
Now let’s discover some useful functions when playing with jobs and the scheduler.
- requestDrain : use this function if you want to be sure that all scheduled jobs at a given priority are over. Simply pass the targeted priority, it returns a promise which can be use to know the completion of the “error state” of the queue processing
- retrieveState : you need to dump the schedule queue for debug purpose ? Use this function :). It dumps the name, the id, the priority of the tasks, etc.
- schedulePromiseXXX : there is a lot of functions with similar names(schedulePromiseAboveNormal, etc.). These functions takes a promise as a parameter. It assures that the completion/error handler is processed on the scheduler with the given priority. If you want a completion handler tob be processed as soon as the promise is done, then use schedulePromiseHigh.
Here are some code example :
[js]
//requestDrain example
var drainPromise = WinJS.Utilities.Scheduler.requestDrain(priority, name);
drainPromise.done(
function complete(){console.log("queue drained");},
function error(){ });
//retrieveState example :
var S= WinJS.Utilities.Scheduler;
S.schedule(function () {/* */ }, S.Priority.aboveNormal,null,"a task name");
S.schedule(function () {/* */ }, S.Priority.idle,null, "infinite square name");
S.schedule(function () {/* */ }, S.Priority.belowNormal,null,"another task name");
var state = WinJS.Utilities.Scheduler.retrieveState();
/*
state looks like this :
Jobs:
id: 22, priority: aboveNormal, name: a task name
id: 24, priority: belowNormal, name: another task name
id: 23, priority: idle, name: infinite square name
Drain requests:
None
*/
//schedulePromiseXXX example
var dldPromise = WinJS.xhr({url:’www.infiniteSquare.com’});
WinJS.Utilities.Scheduler.schedulePromiseHigh(dldPromise)
.then(function(xhrResult){
/* process interesting content */
});
[/js]
Regards.
]]>This was good old times and these issues are gone in Windows 8.1 : youpi !
Let’s digg a little more ![]()
The theme can be updated at runtime
Windows 8 theme resources are provided using StaticResource and so can’t be updated at runtime. The resources are loaded once at the app startup and even if you update it, the controls won’t update themselves because the StaticResource provide the value once and only once : when parsed.
Now comes a new markup extension named ThemeResource. You can use it like the StaticResource object but this special resource will update the targeted control if the Theme of the control is updated. You can see it as the DynamicResource in WPF but only for some “theme” resource and triggered only by a theme change.
Of course, all the template of the frameworks are now using this new feature and you are free (must ![]() ) use it in your own controls. You can actually use it anywhere in your XAML :
) use it in your own controls. You can actually use it anywhere in your XAML :
[xml]
<Border RequestedTheme="Light"
Background="{ThemeResource ApplicationPageBackgroundThemeBrush}">
</Border>
[/xml]
The theme can now be set by control
In Windows 8 you had to set the RequestedTheme property at launch (in the constructor of you app for example) and it could be set only once.
Now this is a property of the FrameworkElement class which is the base class for any control. The value will be inherited by all its children (this is actually done because it overrides values in the resource dictionary which will be available to the children of the control).
In this sample I override the theme twice in the same visual tree :
[xml]
<StackPanel RequestedTheme="Light"
Background="{ThemeResource ApplicationPageBackgroundThemeBrush}">
<TextBlock Text="Hello World !" />
<Border RequestedTheme="Dark"
Background="{ThemeResource ApplicationPageBackgroundThemeBrush}">
<TextBlock Text="Another theme" />
</Border>
</StackPanel>
[/xml]
It then produce this view :

Be aware that this is a “low priority” setting and that all the styles, directly set attributes/properties, triggers, animations and even implicit styles are winning over it.
Questions ?
- Can we set it by code ? : yes of course, this is a normal property.
- Can we use binding ? : Yes !
- What are the value of RequestedTheme for the children of a control ? : The value is “Default”. This only means that the value is not overriden and not that this use the App’s theme (it’s the theme of the first overriden parent which is used).
You can read this post in french too.
You can find more by exploring the “XAML requested theme sample (Windows 8.1)” of the samples pack provided by Microsoft.
Have a nice code
Then I wanted to get a basic information : the language used by the app. Let’s say that the user is spanish and that I didn’t translate my app for this tongue then the app could be in english because it’s the one tongue matching the best its preference. The “english” won’t necessary be the first language declared in my manifest but the best one for the user.
By using a ResourceLoader object, you can get any string in the right language but I didn’t find an easy way to get the actually used language.
By digging into the WinRT APIs, I found a way to get this information and it could help you.
A solution
The trick is to use the MainResourceMap of the app to retrieve a resource candidate for a resource key I know being in all my resources files. With this ResourceCandidate, I can get the ResourceQualifier which made the framework choose this resource. On this qualifier, I can then retrieve the name of the used language…
[csharp]
//I have a resource file named "Resources" for each my language
// and each one has a ‘AResource’ object in it.
var namedResource = ResourceManager.Current.MainResourceMap
.FirstOrDefault(nR => nR.Key == "Resources/AResource").Value;
//I resolve this resource
var resourceCandidate = namedResource.Resolve();
//The qualifier let me know the used language code.
var resourceQualifier= resourceCandidate.Qualifiers.FirstOrDefault();
var languageCode = resourceQualifier.QualifierValue;
[/csharp]
You can also get interesting information from the resourceCandidate object :
- IsMatch: is this resource found using the a language defined in your manifest.
- IsDefault : is this resource found using the default “language” (the one defined in your manifest) ?
- Score : the score of the retrieved resourceCandidate in the resource-matching algorithm used by the framework
An interesting thing is that you can also know the score of the retrieved resourceCandidate in the resource-matching algorithm used by the framework. It’s the Score property of the ResourceCandidate.
Another one
An another solution is to put the language code of each resource file inside the resource. Then you could use the ResourceLoader to get it.

Things I tried
I also tried to use the ApplicationLanguages.ManifestLanguages list but with this API I can get the language declared in my manifest, not the one actually used by the app.
Same thing with ApplicationLanguages.Languages which let me know the user defined languages but not the one actually used by the app.
Do you know a better way ?
]]>However it can be hard sometimes and in this post I will describe how you can create something I first thought it will be easy : a wrapping text with hyperlinks in it.
Something like this :
As you will read, this is not as straightforward as I thought.
I tried a few things before to make it works the way I want to.
#fail 1 : use hyperlink element in the Textblock
Did you remember Silverlight (:p) ? I do and especially the Hyperlink element that you can use in Textblock :
[xml]
<TextBlock IsReadOnly="True">
<Run> Displaying text with</Run>
<Hyperlink NavigateUri="http://www.infinitesquare.com"
TargetName="_blank">hyperlink</Hyperlink>
<Run>.</Run>
</TextBlock >
[/xml]
It’s really nice but…. there is no hyperlink element in the Windows8 Xaml framework… too bad 
#fail 2 : use the tapped event on run elements
There is in fact no such thing in the Windows 8 Xaml Framework so this is a dead end
#fail 3 : use the textblock’s tapped event to retrieve the aimed run element
My third idea was to create a textblock with runs and Underline element to recreate the same display.
Then I can register myself to the Tapped event and grab the tapped run and then open the matching links.
I would then create something like this :
[xml]
<TextBlock>
<Run Text="Cupcake ipsum dolor. Sit amet I love croissant fawork" />
<Run Text=" " />
<Underline FontFamily="Segoe UI">
<Run Foreground="#FFFF1BF5"
Text="I love ice cream" />
</Underline>
<Run Text=". Chocolate ice cream soufflé pastry." />
<Run Text=" Bear claw chocolate tart brownie apple pie." />
<LineBreak />
<LineBreak />
<Run Text="Pastry sesame snaps cotton candy jelly-o marzipan pastry" />
<Run Text=" cake I love faworki. Wypas I love jelly." />
<Underline FontFamily="Segoe UI">
<Run Foreground="#FFFF1BF5"
Text="I love toffee macaroon chocolate bar." />
</Underline>
</TextBlock>
[/xml]
[csharp]
private void MyTexBlock_OnTapped(object sender, TappedRoutedEventArgs e)
{
var run = e.OriginalSource;
}
[/csharp]
The problem here is that the OriginalSource element is in fact the TextBlock itself and not the Run or the Underline element I created. So there is no way to know which link the user touched but only it touched the TextBlock somewhere.
#fail 4 : use a RichTextBlock with InlineUIContainer and an HyperlinkButton element
After these failures, I decided to use a weapon of mass destruction : a RichTextBlock and a InlineUIContainer element.
You can’t just add Run inside a RichTextBlock but instead, you have to create one (or more) root paragraph element.
The InlineUIContainer lets you put any FrameworkElement you want inside a document(the content of the Paragraph). You can then register handlers to the events of this FrameworkElements as you would have in any Xaml UI.
In the code snippet below, I register myself to Tapped event of the Textblock I insert in my paragraph :
[xml]
<RichTextBlock IsTextSelectionEnabled="False">
<Paragraph>
<Run Text="Cupcake ipsum dolor. Sit amet I love croissant fawork" />
<Run Text=". " />
<InlineUIContainer>
<Border Background="#FFF1EFEF">
<TextBlock Tapped="OnLinkTapped" Foreground="#FFFF1BF5"
TextWrapping="Wrap"> <Underline>
<Run Text="I love ice cream, to write very long text " />
<Run Text="and to take some screenshots." />
</Underline>
</TextBlock>
</Border>
</InlineUIContainer>
<Run Text="A Chocolate ice cream soufflé pastry. " />
<Run Text="Bear claw chocolate tart brownie apple pie." />
</Paragraph>
</RichTextBlock>
[/xml]
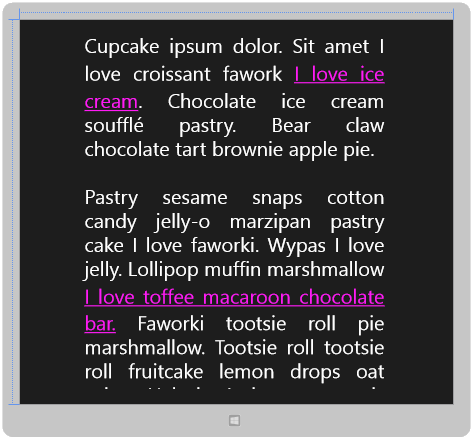
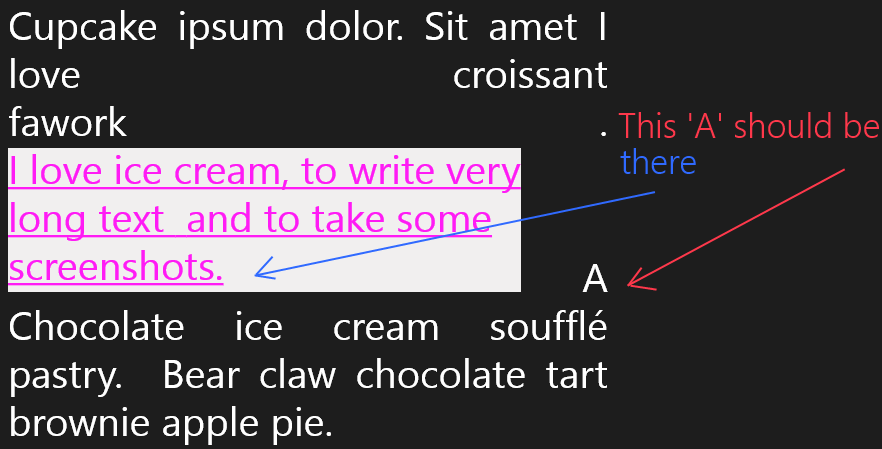
Wonderful… wait … oh no… there is still one issue : the paragraph element will consider the InlineUIContainer as “whole block” and not as “text” and then it will wrap strangely your content. In this screenshot, I added a gray border around my TextBlock show this behavior to you :
#Success : use a RichTextBlock and the GetPositionFromPoint method
I finally found one hack and if you know a better way, please tell me in the comment which one it is
My solution is to use the RichTextBlock’s tapped event and its GetPositionFromPoint method. This method returns a TextPointer for a given position of your RichTextBlock. This TextPointer object has a Parent property which is the TextElement (Run, Underline, Span, etc…) the user clicked on : exactly what we want !
My Xaml then look like this :
[xml]<RichTextBlock IsTextSelectionEnabled="False"
Margin="30"
Width="600"
TextAlignment="Justify"
FontSize="40"
TextWrapping="Wrap"
Tapped="UIElement_OnTapped">
<Paragraph>
<Run Text="Cupcake ipsum dolor. Sit amet I love croissant fawork" />
<Run Text=". " />
<Underline x:Name="LinkToInfiniteSquare"
Foreground="#FFFF1BF5">
<Run Text="I love ice cream, to write very long text " />
<Run Text="and to take some screenshots." />
</Underline>
<Run Text="A Chocolate ice cream soufflé pastry. " />
<Underline x:Name="LinkToMyBlog"
Foreground="#FFFF1BF5">
<Run Text="Bear claw chocolate tart brownie apple pie." />
</Underline>
</Paragraph>
</RichTextBlock>
[/xml]
The last part is to walk trough the parents of the clicked/touched element to find out its Underline parent, read its name and launch the correct action.
[csharp]
private void UIElement_OnTapped(object sender, TappedRoutedEventArgs e)
{
var richTB = sender as RichTextBlock;
var textPointer = richTB.GetPositionFromPoint(e.GetPosition(richTB));
var element = textPointer.Parent as TextElement;
while (element != null && !(element is Underline))
{
if (element.ContentStart != null
&& element != element.ElementStart.Parent)
{
element = element.ElementStart.Parent as TextElement;
}
else
{
element = null;
}
}
if (element == null) return;
var underline = element as Underline;
if (underline.Name == "LinkToInfiniteSquare")
{
Launcher.LaunchUriAsync(new Uri("http://www.infinitesquare.com"));
}
else if (underline.Name == "LinkToMyBlog")
{
Launcher.LaunchUriAsync(new Uri("http://www.jonathanantoine.com"));
}
}
[/csharp]
By the way, I can not use a TextBlock element because it does not have the GetPositionFromPoint method.
Do you know a better way ?
(Please don’t tell me to do it in HTML/JS :p)
The source code is available here.
]]>For example, we did it in the Larousse Illustré Windows 8 app to display media in a different way when zoomed in than zoomed out :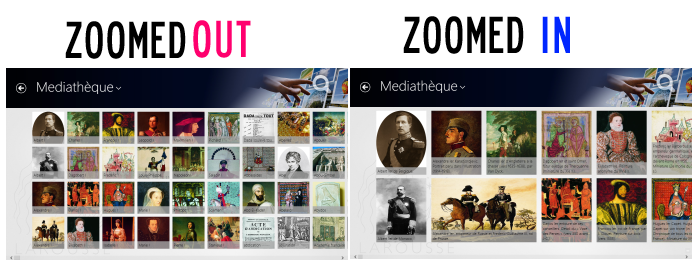
This is exactly the same data but shown in a different fashion. The user choose the one it prefers.
But, if you try to set the same data source to the both listview in your semantic zoom, your app will crash.
An exception is raised because a method “itemFromDescription” is not defined.
The solution to make everything works is to define this method as below :
[js]
var zoomedInListView = document.getElementById("zoomedInListView").winControl;
var zoomedOutListView = document.getElementById("zoomedOutListView").winControl;
zoomedInListView.itemDataSource = myList.dataSource;
zoomedInListView.itemDataSource.itemFromDescription
= function (it) { return WinJS.Promise.wrap({ index: 0 }); };
zoomedOutListView.itemDataSource = myList.dataSource;
zoomedOutListView.itemDataSource.itemFromDescription
= function (it) { return WinJS.Promise.wrap({ index: 0 }); };
[/js]
I hope this will help you
A sample is available (scenario 2) on my Dropbox.
]]>