The solution I ended up with is to create an AppDomain by “worker” and to execute the already existing code in each one. The context will be unique in each AppDomain and I will be able to reuse my existing code.
To have this working I have to perform these steps:
- Create a new class project “MaDllAPart” on which I add a reference to my existing code assembly.
- Create a new class “StartPoint” in it which inherits from MarshalByRefObject. This will let it be called from another AppDomain (my new WPF application in this case).
- Add an “Execute” Method to my StartPoint class which calls my legacy code.
- Create an AppDomain by thread, instanciate a StartPoint in this AppDomain.
- Instanciate a StartPoint in this AppDomain and call it’s Execute method.
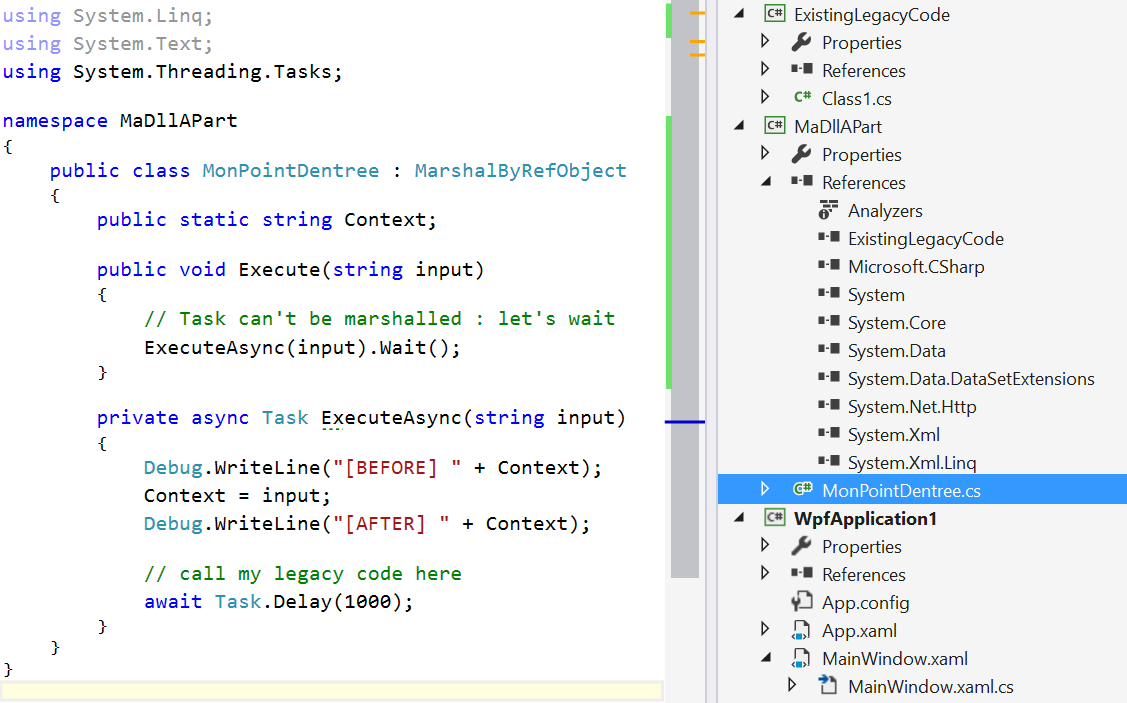
The code for the StartPoint class is very easy :
public class MonPointDentree : MarshalByRefObject
{
    public static string Context;

    public void Execute(string input)
    {
        // Task can't be marshalled : let's wait
        ExecuteAsync(input).Wait();
    }

    private async Task ExecuteAsync(string input)
    {
        Debug.WriteLine("[BEFORE] " + Context);
        Context = input;
        Debug.WriteLine("[AFTER] " + Context);

        // call my legacy code here
    }
}
The “MaDllAPart” is added as a reference to the WPF project : this let’s me create an instance of StartPoint without special configuration from my side. Be sure to use the full name (with the namespace) of the instanciated type.
private static void LaunchProcess()
{
    for (int i = 0; i < 10; i++)
    {
        var domain = AppDomain.CreateDomain("MonAppDomain_" + i);

        var startPoint = (MonPointDentree)domain
            .CreateInstanceAndUnwrap("MaDllAPart", "MaDllAPart.StartPoint");

        startPoint.Execute("module " + i);
    }
}
Happy coding !
]]>About appxbundle
When you build an app, you can choose to translate it and add ressource dedicated to a special environments. Images/Logo specific to each pixel density plateau is one example of it. If you create bundles, your final package uploaded on the Store will be one “main” package and satellite package for each “specific target”.
It also means that the user will download only what is necessary to their devices : less bandwith used, smaller apps : happy users !
Creating app’s bundle is easy, in the last step of the Visual Studio package wizard, you choose either “If Necessary” or “Always”.
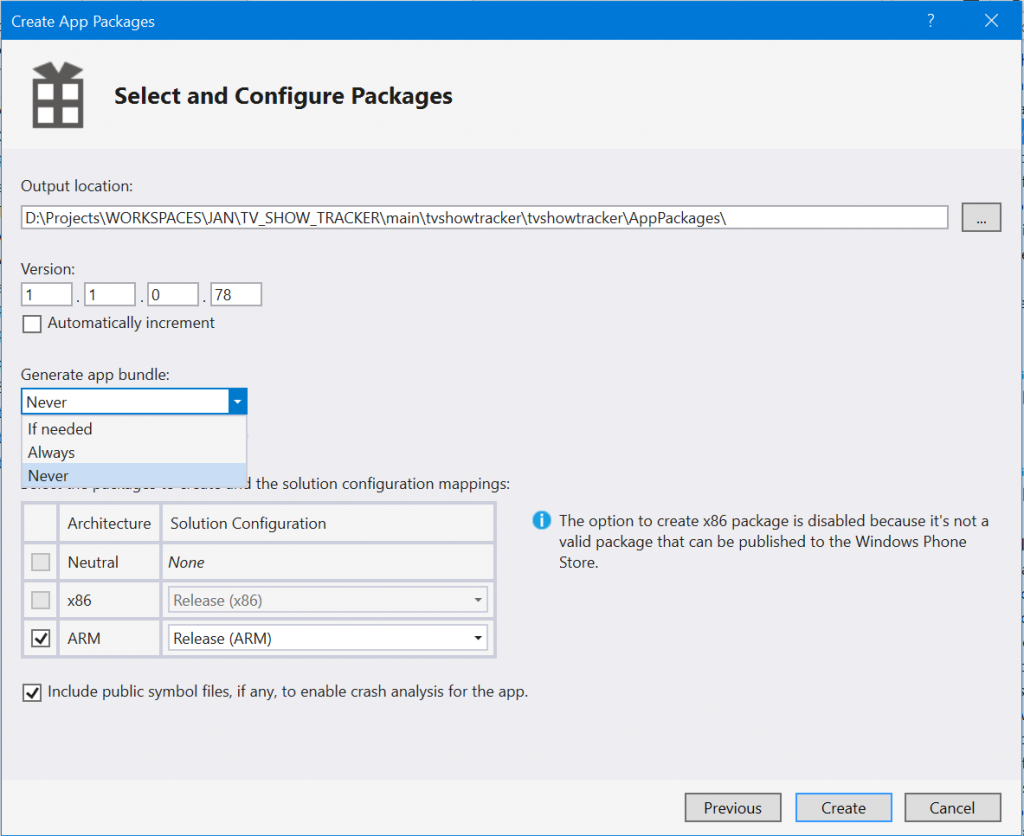
Choosing to use app bundles has some consequences. The one which I was not happy with was that you won’t be able to let the user choose the language of your app since only the languages installed on it’s device will be available.
In my last update of TV Show Tracker, I wanted to let this freedom to my users so I used the wizard and choose to never create a bundle. I uploaded my package to the Store and I then get the previously mentionned error 

Creating my own appbundle
The solution is then to create my own app bundle with the SDK tools and upload it to the Store.
Here are the steps :
- Create a package using Visual Studio without app’s bundle.
- Go to the created package folder and find the appx file (it can be in a subfolder).
- Copy this file in a separate folder, all alone.
- Use the MakeAppx tool to create a bundle aiming this directory.
- Upload the created bundle to the Store.
makeappx bundle /p NameOfTheCreatedBundle.appxbundle /d FolderWithTheAppxInside
The name of the bundle can be anything as the name of the folder with the appx inside.
What did I lost in the process ?
The whole app with all ressources will now be downloaded by my users. This can be frightening : how much more will they have to download ? Let’s take a look inside the app bundle…
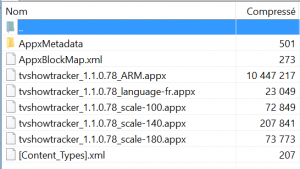
So an user on a standard density pixels, english phone will now download the not used “scale-140” assets, the “scale-180” assets and french language : 300 more kb –> 2,85 %. So for 2,85% more package size, my user will be able to choose the language of their app. That’s ok for me 
Happy coding !
]]>There is already some good books in english which can help the developers to discover and understand it but there were none in French.
This is no more the case because my friend Thomas Lebrun (blog, twitter) and I wrote one entitled “MVVM De la découverte à la maîtrise”.

You can buy it at different places:
- A numeric version can be found on our editor page
- It is available on Amazon too
- The french store, “FNAC” is selling it too !
- A printed version can be ordered on lulu
Here is the different things we have covered in it:
- Présentation du pattern MVVM
- Les différents éléments et leurs rôles
- Les différentes philosophies (view-first, model-first, view-model first)
- Construire la partie modèle
- Construire un ViewModel
- Construire les vues
- Edition de contrôles personnalisés
- MVVM et Testabilité
- Glossaire
Feel free to share this post
An updated, working, version of the source code is available at this adress : http://db.tt/XQfstVbB
Regards,
]]> Windows 8 is here and Visual Studio 2011 comes with it hand in hand.
As you may already have read/seen/watch, there is a new set of applications coming named as ‘metro’.
Visual Studio 2011 then comes with templates for different types of applications: basic Application, Grid Application and Split Application. Each one helps you create application for windows 8 with the metro style.
In this post we are going to explore in details a first type of application template: the Grid Application.
What is a Grid application ?
A grid application, as the template says, is “a multi page project for navigating multiple layers of content with item details details displayed on dedicated page“.
Actually, it looks like a composition of Windows Phone pivot and panorama. There is three level(the layers..) in the application. The first one display a list of the available collections. Think of it as groups. There is a scrollbar at the bottom which indicate that it the data does not fit, you can scroll inside.

Then when you ‘touch’ (oups, I forgot to use the ‘click’ term ) on a collection name, you drill down into the collection details. Notice that touching an item make the app goes directly to the item details.

Finally when you are on the collection details, you can click on an item and go to its details. Notice the button at the left and the right which enable navigation trough items.

EDIT:
I forgot yesterday to point out that this application has a different UI when it’s used in “splitted mode”. This is a really nice feature and here is the screenshot:

Let’s create one !
To create an application, you can use the Visual Studio usual wizard and select the grid application template:

Then you have the following screen in front of you:

It’s time to pay attention to certains things:
- There is no reference in this project !
- The productivity power tools is here by default in Visual studio !
- There is a lot of files and not only the traditional App.Xaml and MainWindows.xaml !
The first bullet is easy to explain: just open the project file with an XML editor and you will find the following little comment line.

What are the default files ?
There is a lot of files by default:
- App.xaml: this files contains a lot of resources used by the application. Fonts, brushes, controls’ styles, controls’ template and even the application name is inside.
- CollectionSummaryPage.xaml: this is the page which display the details/summary of a collection.
- DetailPage.xaml: this is the page which display the details of an item.
- GroupedCollectionPage.xaml:this is the start page which display the collections.
- Package.appxmanifest: this file defines how the application will be displayed in the market place. It looks a lot like a windows phone manifest file but with a nicer editor.
How the navigation is handled ?
Did you noticed that I used the word ‘page’ and not ‘Window’? This is because there is only one window which display the pages.
The pages are actually UserControl(declared in the Windows.UI.Xaml.Controls namespace…) which are set as Content of this unique Windows. One funny thing is that there are declared as partial classes but the base class is only declared on the ‘generated’ class matching the ‘XAML’ one:

The App class exposes static methods which are called from the pages to navigate to the other pages. Here is an example of one of them:
[csharp] public static void ShowGroupedCollection()
{
var page = new GroupedCollectionPage();
if (_sampleData == null) _sampleData = new SampleDataSource(page.BaseUri);
page.Groups = _sampleData.GroupedCollections;
Window.Current.Content = page;
}
[/csharp]
From where does the data come from ?
I though that the classic design data generation from blend will be used but to my great astonishment, the data displayed by default is ‘hand made’. There is one class named ‘SampleDataSource’ which is (as you can see in the previous snippet) created when you navigate to each page. In the constructor of this class, each item is created with a line of code.
If you want to use your own collections and items, this is easy: create the data objects and put them inside the properties of the pages. As an example of what is done on every pages, the GroupedCollectionPage (displaying the collections), exposes a ‘Group’ property. The setter of this property will use the value as a source of a CollectionViewSource in the resources of the page:
[csharp]private IEnumerable<Object> _groups;
public IEnumerable<Object> Groups
{
get { return this._groups; }
set
{
this._groups = value;
GroupedCollectionViewSource.Source = value;
}
}
[/csharp]
And about the animations ?
As you can’t see there is a some animations when you navigate from one page to another. I won’t go in details here because this is pretty classic stuff done by using the Visual states so one one is going to be surprised here
EDIT: you may find interesting that the splitted mode of the app is also one Visual state.
What more to say ?
This application template is quite complex for a start but it is greatly done.
I think that it can be difficult to use for beginners because there is a lot of things which are not as easy as it can seems: CollectionViewSource, resources resolutions, visual states, etc… But this is really nice for someone who knows these things
The code, XAML or C# is well commented and there is explanation on every important lines which make it easy to understand.
Finally, you can see that this is only a preview by the number of work around and temporary things you can find. The search windows finds 5 ‘temporary’ and 5 ‘workaround’ in this template for me !
]]> Sometimes you need to set property on controls from the code and then you realize that this is not like in XAML: these are not strings? No, they are not! This is because the XAML processor convert the string to the correct type when it process the XAML. In this post we’ll see how to reproduce the same behavior from the code: a little snippet which can help you someday !
As you can find out on MSDN, everything is done trough the class TypeConverter. For any type, you can create a TypeConverter (to be precise: a class inheriting from TypeConverter) which will convert it from any other type and especially string. Note that there is only four methods used in the XAML processing: CanConvertTo, CanConvertFrom, ConvertTo, ConvertFrom.
When the XAML processor process the XAML it checks, the presence of a TypeConverter attribute on the target property. This attribute simply specify which converter can be used to convert a value from a given type to a value of the aimed property’s type. If it exists, the XAML processor instanciates one and use it to convert to the correct type value.
Here is the snippet, in his simplified version, I use to reproduce the same behavior in code:
[csharp]
public T ConvertTo<T>(string originalString)
{
var typeConverter = TypeDescriptor.GetConverter(typeof(T));
if (typeConverter != null)
return (T)typeConverter.ConvertFromString(originalString);
else
{
var errorMsg = string.Format("Cannot retrive the converter of type{0}",
typeof(T).Name);
throw new ArgumentOutOfRangeException(errorMsg);
}
}
public T ConvertTo<T>(object originalValue)
{
var typeConverter = TypeDescriptor.GetConverter(typeof(T));
if (typeConverter != null)
return (T)typeConverter.ConvertFrom(originalValue);
else
{
var errorMsg = string.Format("Cannot retrive the converter of type{0}",
typeof(T).Name);
throw new ArgumentOutOfRangeException(errorMsg);
}
}
[/csharp]
I can then use it to do the most common thing in XAML: create a SolidColorBrush from a string. You can notice that any representation can be used: hexadecimal, name of the color, etc. :
[csharp]SolidColorBrush redBrush = ConvertTo<SolidColorBrush>("Red");
SolidColorBrush anotherBrush = ConvertTo<SolidColorBrush>("#FF125645");
[/csharp]
This is just an exemple and this snippet can be enhanced with, for example, calls to CanConvertXXX. Also if you want more information on TypeConverter and how to implement a custome one, I recommend you to read the MSDN page which is quite well written on this subject.
Regards,

But it can be quite long, especially when the file is on a network drive. If so you’ll have to wait for a time-out to know that the file is not reachable.
This was too slow for me so I coded this little utility which performs the same but with a customizable TimeOut. As it may interest you, here it is:
[csharp]private static bool VerifyFileExists(Uri uri, int timeout)
{
var task = new Task<bool>(() =>
{
var fi = new FileInfo(uri.LocalPath);
return fi.Exists;
});
task.Start();
return task.Wait(timeout) && task.Result;
}
[/csharp]
Enjoy !
]]>The goal is clearly simple: to become the best Windows Google Reader client.

This is done in WPF 4.0 and I am a part of it !
The beta 1 is now out and you can get it here. It is made to satisfy you, the users so don’t hesitate to push your ideas/will to us directly from this page.
For more information on the new features, please read David’s post on his blog.
Have a nice day !
]]>